Monday, April 7, 2014

Quick Easy Brow Tutorial

Hello there! 
This is a short video i created to show you all how i fill in my eyebrows on a daily basis. 
I have had many requests on a tutorial on my brows. Please try not to get overwhelmed, and as always if you have any questions please ask! Below the Video i have given a list of my product used, in order. 


  1. Anastasia Beverly Hills Brow Wiz in "Blonde" to fill in the general shape of the entire brow. 
  2. Anastasia Beverly Hills Brow Pomade in "Chocolate" using a very small precise angled brush. Used on the bottom perimeter and tail of my brow. 
  3. TIGI Cream Foundation in "Fair" using a small rounded concealer brush to outline the entire brow to give a more defined look. (This prevents a "bushy" brow if you accidentally colored in a little too much in the beginning. 
Hope you all enjoy! Thank you for watching!
LOVE
Kiki Mamma

Saturday, March 15, 2014

Bronzed Out J-Lo Status

Hi my friends! 
It has been too long since my last post. I apologize for making you wait so long! I have a great post for you today. It's all about getting a bronzey sun kissed look. I show all the products i use for the entire face and go into detail on each one! Basically if you want to look like J-Lo then stay tuned! Also, if you aren't already, go follow my instagram page here to see my daily makeup looks! 
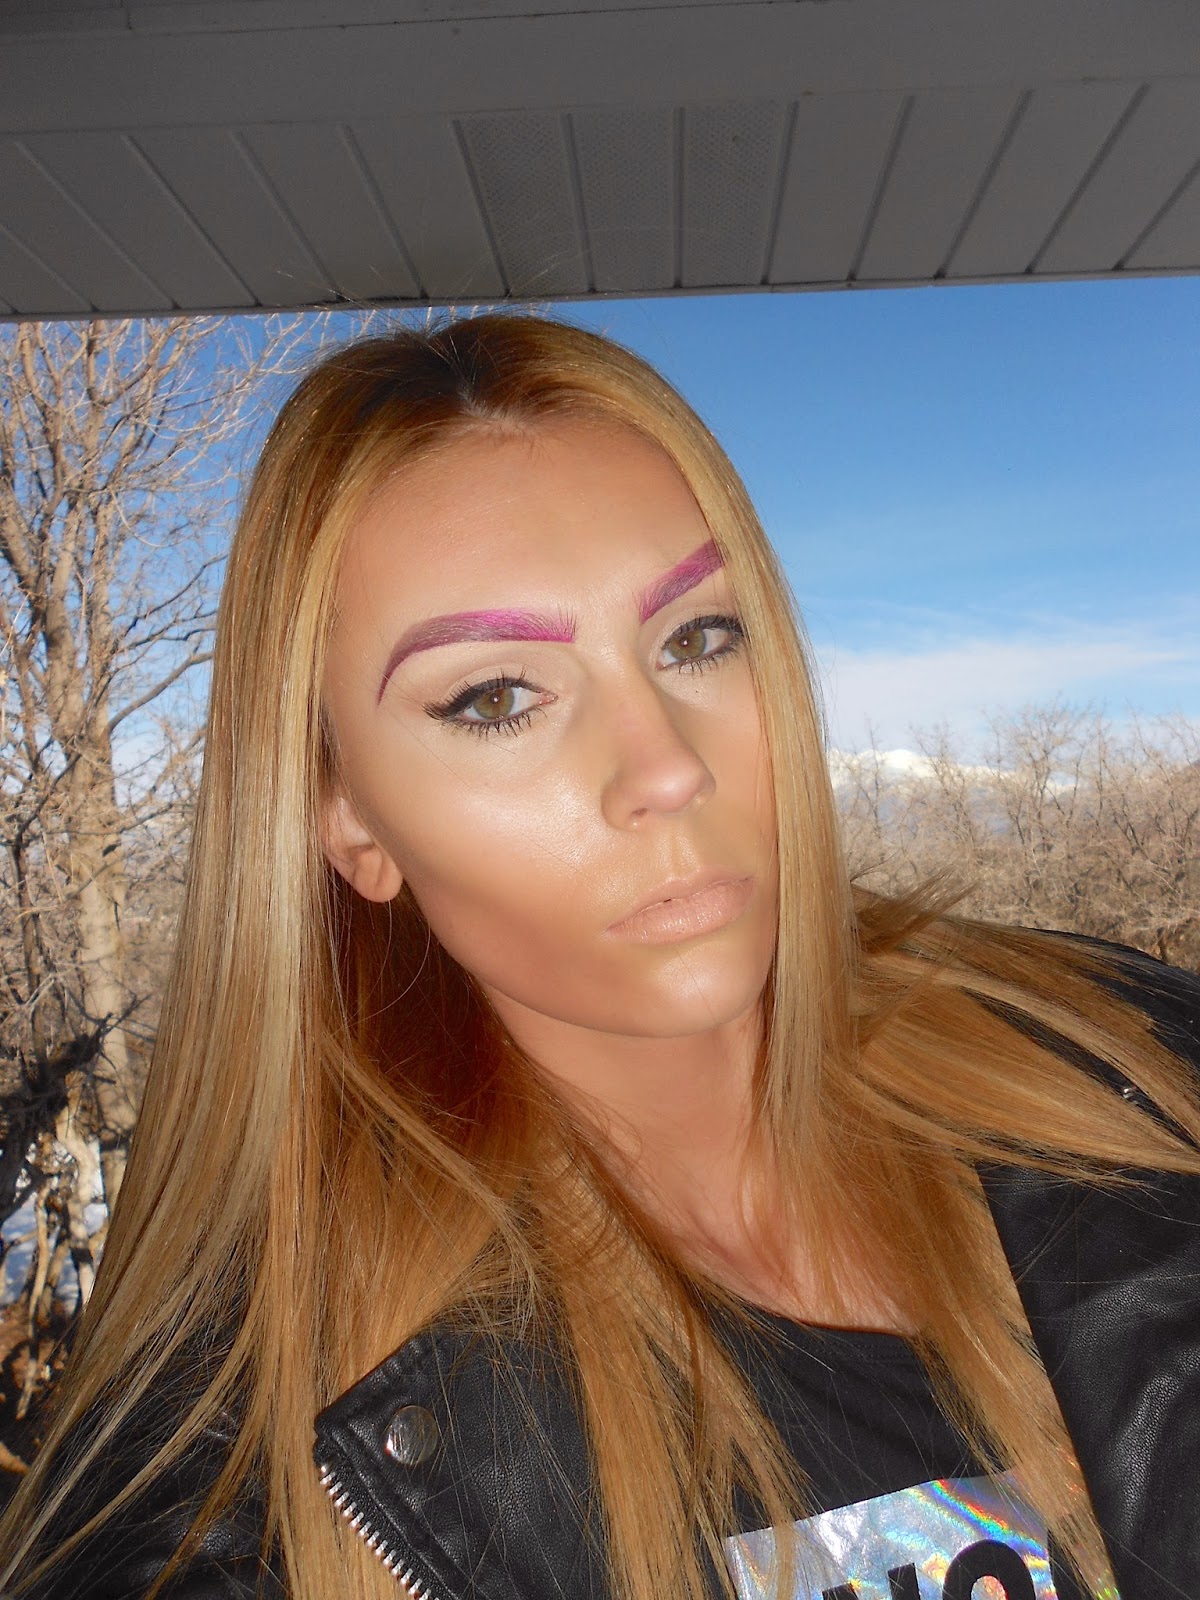
Here is the look:

Lets get started!
 First i did all of the foundation. Sometimes i choose to do brows and eyeshadow first so i can clean up with my face with the foundation after. But today the eyeshadow is very basic and not complicated at all.
 I used this TIGI Cream Foundation in the shade Light for under my eyes, a little on my cheeks and anywhere else where i felt like i needed a little more full coverage. Below is a picture of the 4 shades in come in. These are the same foundations i used in my contour tutorial on YouTube here.

Then i applied MAC Face and Body Foundation in the shade C4 all over the rest of my face. This foundation is SUPER runny because it has a water base. This foundation goes on more translucent but can be layered to a full coverage look. I like it for myself because it is very hydrating for my dry skin. Some oily skin types may not like the certain foundation because it can make them feel greasy, but for most skin types it works quite well. Just remember to set it with a loose powder after applying! I used it for this look because it has a great dewy finish. 

For my Brows i used all Anastasia Beverly Hills Products. This is a new brand i have been working with, but i am so impressed with the quality, and i don't think i could use anything else for my brows ever again! First i used the product on the left. This is a brow liner called Brow Wiz in the shade Blonde. This is what i used for the inner corners, the top line of my brows, and the high arches. I used this lighter color for those areas so my eyes are look very open. Sometimes when the inner corners of your eyebrows are penciled in with darker shades is can really close off the eyes. Be careful with that! 
The picture on the right is called Brow Pomade in Chocolate. This is what i use for the bottom line and outer tail of my brows. I use a very small angled eyeliner brush for this step and am very careful not to draw a harsh line on the bottom on the inner corner. Blend those brows! If i want to blend any harsh lines i just use an eyebrow want and brush my brows a little. Good news, the brow wiz has a brush on the other end!


 This shadow is easy easy! TIGI High Density Eye shadows are very pigmented and pack on extremely well. I packed this eyeshadow in Natural on the inner corner, underneath my bottom lashes, and on the top on my lids. 

TIGI makes these eyeshadow quads that are a good bang for your buck. They pair the shades so well so you can get an amazing look fast and easy without having to dig through your makeup bag for all of your shadows. I used this quad called Love Affair. The middle right shade i used on the outer corner of my eyes, and then the bottom shade i lined on my bottom lash line. 

After blending all of those bronzy browns i highlighted my brow bone with this High Density Shadow in Champagne. I LOVE this shade because it highlights so beautifully! 

After my eyes were finished i worked on my face a little to give it a sun kissed look. I used the High Density Shadow in Natural that i used on my lid on my face as well because it gave my face an amazing glow. I put this shadow on the top of my cheeks, down my nose, on my chin and above both of my eyebrows. This shadow was perfect!

Then i contoured a little with this TIGI Bronzer. Nothing too intense. 


I set everything else that didn't get any powder with this TIGI Powder Foundation in the shade Beauty. Remember to always set your work with powder. It will help with the longevity throughout the day. 


I gave myself a little cat eye, hardly lining the top of my lash line so i didn't take away from my eyeshadow. 

 Did my lashes with this Eyes Love It Mascara in Black. I like this Mascara because it stays on pretty well throughout the day and it has rose oil in it, so it smells super yummy!


 I lined my lips with this TIGI Lipliner in Nude. It's one of my favorites if you haven't already noticed!


Put this TIGI Lipstick in Beauty all over my lips. This is what the old tube looks like. 

This is what they new packaging looks like so you can find it better!

Over the top i used this TIGI Lip gloss in Your Highness. This lip gloss is extremely THICK. If you want a gloss that literally stays on allllll day, this is your little number. Some do not like this thick feel, but personally i love it because it means less touching up during the day and you will have this lip gloss for YEARS!

 Finally set my face with NYX Dewy Finish setting spray. If you have been following me lately you know i have been loving this stuff! I truly feel that my makeup stay on so much better with the help of this product. If you don't like dewy they also make one in Matte! and its only $4.99! 

The final Look one more time...

Thank you everyone for reading. If you have any questions please feel free to ask! If you would like to follow my #MOTD (Makeup of the Day) i post daily on instagram, go follow me here. Yay for bronzy J-Lo lovin' makeup!
Love you all!
Kiki Mamma

Saturday, March 8, 2014

My First Makeup Tutorial


Big News! 
My first Tutorial is finished!
Thank you friends who pushed and motivated me to get this done. I am so excited for more tutorials in the future. 

Let me tell you a little bit about this tutorial. It is an in depth explanation of how to contour using cream foundations and then setting with powder foundations. Let me warn you; this is not meant to be an everyday look, unless you are one who loves to wear a lot of makeup everyday. I typically only do my makeup like this for certain events, weddings, parties, special events, anywhere i know i will be on camera or film basically. In the future i will definitely post some more conservative looks for face makeup and foundations! 

Thanks for watching everyone and, please, share with your family and friends. If you have any question please comment and ask them, i would love your feedback. Don't forget to subscribe when you are done watching so you can be up to date with all my future tutorials!


Wednesday, March 5, 2014

Brows, Brows, and more Brows!


It's been too long my friends.
Today my post is all about Eyebrows. The most important feature of your face, in my opinion, next to your eyes. If you know me at all, you know i am a brow freak! I get lots of questions on my brows. How i pencil them in, what products i use, etc. Don't worry girls, i am in the process of making tutorials that i will upload to youtube which will consist of all my makeup tricks! Coming soon! YAY!

Until then...
We will be splurging on everything brows in this post. Fashion week has been happening everywhere lately. I drool over the many posts i see everyday! I get so excited about the hair and makeup especially, and brow have been on point lately! Let's look at the inspiration of brows in fashion, shall we?

Cara Delevigne. 
The IT girl.
That girl with the bushy brows?
You bet. 
That's her.  


This girls brows have a mind of their own. They are her signature look. With out them she frankly would be your average model. Designers have taken her brows and embraced them; incorporating them into many looks the past year. 

This picture was taken from Celine Spring/Summer 14' collection from Paris Fashion Week. Very exaggerated... but you can't deny it!

Gold Brows
 This would be very fun to try for a night out or a special event. This look was from Christian Dior's Spring/Summer 14' collection from Parish Fashion Week.

Filling your brows in a different way can really change your look. If you didn't notice already, this is Kendall Jenner (The younger sister of the Kardashian girls). It made her look totally different, but i don't think that's necessarily a bad thing. This look was created for Marc Jacobs's Spring/Summer 14' collection for New York Fashion Week. 

Colored Brows
Colored Brows are just surfacing. I have only seen this look a few times in Utah so far, but i believe it could get really popular in the future. I personally love it. It's something in makeup that has never been done before as a day look. This look was from Beste Gurel's Spring/Summer 14' collection at Istanbul Fashion Week. 

I love how this look transitioned from light to dark. By doing this it creates a subtle ombre effect; this helps by not closing the eyes off. 

Pastels, perfect for spring. 


 And here is my attempt. I'll be honest... i did get some odd looks from strangers that day at the doctor's office, the gym, and running errands! I really did want to test this look out though. I applied the product in more of an ombre transition to help the color look a bit softer. Because my brows were so bold i chose a nude, glossy lip. I didn't want to overpower my face and be mistaken for drag! 
For the pink i used a NYX Lip Pencil and transitioned it with my brown gel liner from MAC. 


I paired my spunky brows with this new crop top long sleeve shirt i snatched from Forever 21 for $10! 
So Gangster!


I know this post was little far out, maybe not applicable to some of you, but fashion is so organic and moving. It's very fun to follow the trends! Stay tuned for some awesome tutorials! 

Love, Kiki Mamma

Wednesday, February 26, 2014

Red Velvet Lips and Formal Plaid

Hello Friends!
Today i am going to break down an outfit from last week that was majorly discounted. I love sales! A makeup choice i thought would go well with this was a deep Ombre Lip. I have notices a lot of dark, deep, red lips surfacing lately. This is a convenient look because it pairs very nicely with a more semi formal outfit choice and doesn't take the time a smokey eye would. 

Let's get started.


I did my hair half up for this one. This is something i haven't done for a LONG time. I was inspired by Khloe Kardashian who has been doing this sleek look recently. Because my hair was really tight and away from my face i decided my makeup need to be crisp and on point. I did a lighter version of what my brow normally is, a light cat eye (using TIGI Liquid Liner) and deep lips. Remember for everyday makeup either excentuate the eyes or the lips, but not both. If i enhance my lips i usually wear a simple falsh eyelash strips to give my eyes a little pop without being overwhelming. 


I tied my pony with a small rubber elastic then wrapped a tiny section of hair around the pony tail so no elastic was visible. 


Plaid it still hot! Add it to your wardrobe! I found this top 40% off clearance at EXPRESS for under $15! 


I paired the top with some dressy shorts, also from EXPRESS. 


I have been looking for a pair of footed opaque tights EVERYWHERE. Finally i found them at H&M on the BOGO free rack! My shoes are made by Steve Madden. I found them at Century 21 in New York for $75. Originally over $150. 


Ombre those lips! I have seen this look everywhere lately!


TIGI Cosmetics Blush in Lovely.


I line the outer corner with my TIGI Cosmetics Lipliner in Kiss. I absolutely love TIGI Lipliners because they are super creamy, full of jojoba oils so they don't dry out your lips. Plus they glide on SUPER smooth and stay on ALL day. I lined my cupids bow and middle of lips with this red MAC Lipliner. Remember to prime your lips before you start with an eyeshadow base or concealer! This will help with longevity!

I followed this liners with these Satin MAC Lipsticks. The Right in MAC RED and the left in FILM NOIR. I blended the line by patting with my fingers. 


Let me know what you think ladies. Remember, don't buy anything unless its on sale!

KIKI MAMMA

Wednesday, February 19, 2014

My Review on Vinylux: The Golden Nail Polish

Are you ready for me to blow your mind?

Remember when Shellac surfaced and everyone fell in love with gel nails? I should know because i was one of the first who swore "i will never use nail polish again." I'm eating my words you guys...CND, you did it again! and this time its better than ever. 
Introducing:


CND was one of the first companies to create the revolutionary Shellac. The first gel nails. Gel polish has many benefits, but today i am going to explain why i have switched back to regular polish again! 

Okay Ladies, Let me tell you the reason i love Vinylux so much. 
  1. You don't need a stupid Base Coat! Just buff, clean, Polish, and Top Coat! 
  2. No stupid $200+ light required! Vinylux does not require a UV light to cure the coats. In fact, their patented top coat technology hardens the surface of your polish over time. The longer the polish stays on your nails, the harder it gets. This means no chipping! This also means shorter time in the salon! Are you convinced yet? Wait! There's more!
  3. Incredibly fast drying time. I'm not kidding you guys, by the time i get back to my pinky fingers its perfectly dry. Let me give you an example: I was at the salon and had about 45 min. to kill until a men's cut. I thought..."well i might as well do some Vinylux on my nails while i'm waiting!" It took me about 15 minutes from start to finish, when i was notified that my haircut came 30 minutes early! Crap. In a normal situation you would panic. I would probably end up taking all the polish off because there would be NO WAY you could do anything reasonable for the first 30 minutes after applying regular nail polish without getting ripples and smudges. No joke...i took my men's cut immediately and i had no mess ups! It dries so fast!
  4. A huge selection of shades! There are 62 shades of Vinylux currently, while more are coming out in special editions as we speak. This is plenty of choice for me.
  5. No more wrapping your fingers in tin foil for 20 minutes and chipping off the paint, only to find your nails a little dried out and damaged. Vinylux comes off with just acetone like a dream. No damage here!
  6. You can take this home with you! Yes! Come get it done by myself, and literally take the bottle home with you so you can touch it up whenever you please! Because Vinylux is a professional product it needs to be purchased through retailers like salons, etc. No worries my friends, Suggestions Salon and Myself have you covered. If you are not a mani kind of girl, you can buy the Top Coat and your selection of Colours for about $10 a bottle. This is luxury polish without the price tag. 
Okay now, if you still aren't totally convinced that this isn't just glorified nail polish i have some hard evidence for you doubters. The Picture below was 7 days after i applied the polish. Can you see any flaws? There is minimal chips slighty at the free edge. I swear i did not photoshop this! 


Did i fully convince you? Do not waste any more money on regular nail polish. Have beautifully polished nails for once! Come see me at Suggestions Salon on Orem Blvd. $10 for a polish with Vinylux if you add it to another service, and about $10 a bottle to take home for yourself!
call 8012266993 for appointments and ask for, me, Kirsten Tobar!

Stay beautiful ladies!
Kiki Mamma

Click the link to watch more info about Vinylux from the CND official YouTube page.


Monday, February 17, 2014

Conservative Punk

Hello hello!

Today i am going to break down a few looks i have really seen trending within the last few months:

FLANNEL
Pull that flannel from the back of your closet and put it to some use! Flannel is back! I have seen a few of the Kardashian's rocking the lumberjack style quite a few times now, as well as even guys, almost always tied around the waist. I LOVE this new trend because it really flatters my small waist and bigger hips. I'm always looking for new ways to wear bottoms with my booty, and this is perfect! I pulled this guy from my high school days. It's made by RVCA and was around $40. 


GOLD GOLD and more GOLD
Gold chains have always been my favorite thing to search for, but lately i have been finding them easier. This certain chunky diamond chain was found at Forever 21 for $2.50!


CROP TOPS AND BASEBALL SHIRTS
We all know crop tops have been popular for a minute, but Baseball tops are just starting to get hot! I have been seeing them everywhere in the stores. I personally like crop tops because most normal tops are too short for my tall torso. This cuts out a lot of problems for me! If you feel like you can't rock the crop top try wearing a looser style. But please! Go buy yourself a Baseball shirt! I got this one at Express for 40% off clearance, i think $7. 


MESSY, MESSY HAIR
If you flip through the pages of vogue, you'll notice that hair trends are extremely undone. This look goes perfectly with the punk/grunge fashion that is surfacing. I was inspired by this, but wanted to look a little bit more kept. 
This look took me about 10 min. to put together. Listen up!
First i did a big french braid in my hair last night. I didn't take it out until this morning. My hair was already about the 3rd day feeling at this point. When i took the braid out it was very crimped and kinked at the ends. I utilized my straightener to do around 10 very tight curls on the top surface of my hair to give it more height at the base. I alternated all the curls in different directions and away from my face at the very front near my face. This gave my hair much more texture and a more natural, beachy curl. I shook my hair really well, sprayed it with some stronger hold hairspray (TIGI Session Series Hairspray) and scrunched it up with my hands.
Walla! The "I didn't even do my hair today, except i did" look! 


SMOKEY EYES AND AN ORANGE LIP
This is an extreme look for makeup, but i feel it was appropriate considering my bold outfit choice. If this look is too much makeup for you, i would do just one or the other. Smokey eyes are always a hit, and they are very striking, but orange lips are a NEW trend that i have seen this NYFW on the Red Carpet.
 I chose TIGI Lip Creme in Miami. 
I picked this because i was in a pinch and i didn't have much time to spend on my lips. (Mostly because i spent way too much time on my eyes...) haha. This particular product i chose flatters almost all skin types well and really keeps my lips hydrated. Plus the longevity of it is amazing!  


 PLATFORM SHOES
I have been searching for the right pair of platform sneakers for a LONG time! Finally i found this pair at the vans outlet for $45! yay for sassy, cheap, comfortable shoes! If you can't find this particular pair i just saw some today that are just plain black at H&M. This is a good option for you shorter girls, you all know i don't need that! 


This is all i have for you today lovely ones, until next time!
And REMEMBER...
don't buy anything unless it's on SALE!

-Kiki Mamma